HATHA YOGA - LESSON 1
About Lesson 1
There are literally hundreds of postures, but only about twenty
are necessary to work the chakras.
What I want to do introduce you slowly to Hatha Yoga with the
first and easiest asanas (poses). Then should you really want to advance to
learn more advanced poses, I would be happy to help you.
Please remember that Yoga sped up too fast can do harm, both
psychological harm and psychical harm. So the pace I like to take is a three
year course for anyone interested in it.
Please read and view this whole lesson
before practicing this lesson.
Disclaimer: There are inherent risks in doing any form of
stretching. Please consult your doctor prior to practicing hatha yoga if you
have any concerns.
Lesson 1 Includes:
- The Introduction to Hatha Yoga Lesson 1
- Pose 1: Sarvangasan (The shoulder stand)
- Pose 2: Sethu Bandhasan (Bridge Pose)
- Pose 3: Kama Peedasan (Ear-Knee Pose)
- Pose 4: Swing Pose
- Pose 5: Padmasan Pose (Lotus Pose)
- Pose 6: The Relaxation Pose
Introduction
Welcome to a few very important Hatha Yoga postures. These
postures will allow the chakras to unfold and begin spinning their energies
upwards.
I have been teaching Yoga for over 50 years now and would like
to pass on to you some aspects of REAL Yoga. Although Yoga means Union, it is
Union with the SELF. Yoga is not effortful. If it is, then stop doing it.
Yoga should be done with Love. When you love doing something,
there is no effort involved. If there is effort, you have stopped loving.
Begin your Yoga lessons with a feeling of love and relaxation
and continue your lessons as long as you feel that.
Yoga is not practiced so you can get thin and get healthy.
Although they are by-products of the study, but this is not why one practices
Yoga. One practices Yoga to Unite with SELF.
When that Union occurs, you "experience" SatChitAnanda,
which means, Being Ever Existent, Ever Conscious and Ever Blissful.
When this occurrence happens it is called Samadhi, and may last
a short time only. Extended Samadhis come later and we shall discuss that at a
future date.
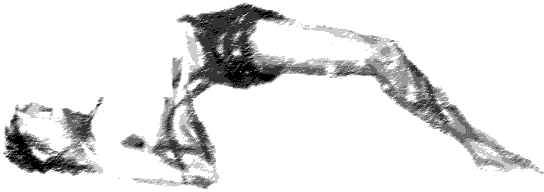
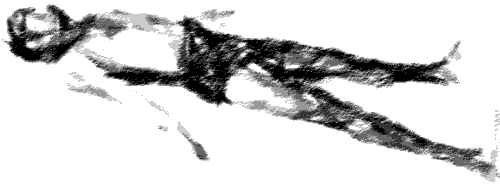
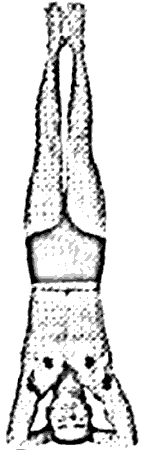
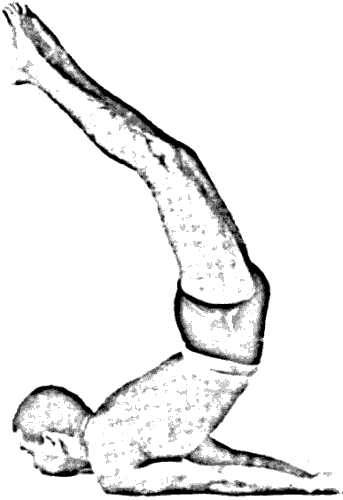
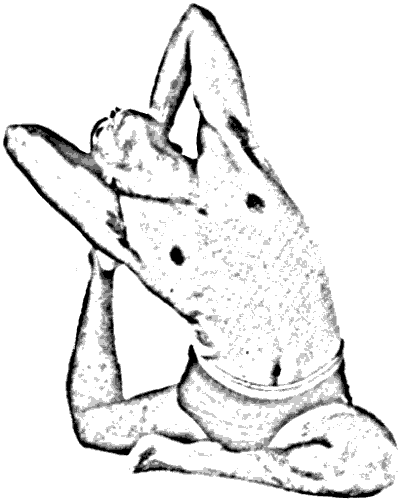
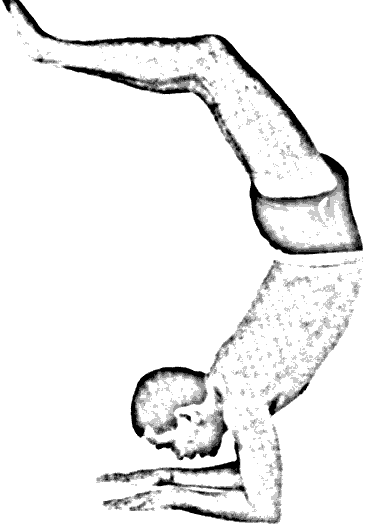
Pose 1 - Sarvangasan (The shoulder stand)
Make sure you have a blanket or thin matting on the floor.
-
 Raise
yourself up on to your shoulders with the help of your arms. Tuck your chin
into your chest while doing shallow but regular breathing.
Raise
yourself up on to your shoulders with the help of your arms. Tuck your chin
into your chest while doing shallow but regular breathing.
-
Concentrate on the 5th chakra in the throat the
thyroid and the parathyroid gland. Visualize light covering the throat area.
-
You will see by the picture on the page that you want to
attain a completely vertical posture with feet pointing heavenward.
-
Push the center of your back right in over your chin so that
you can throw your hips in true vertical. This way the legs will rest
comfortably as on a fulcrum.
-
Keep very still. Do not sway about. Keep concentrating on
the throat chakra. Hold this pose for as long as you are comfortable and love
doing it.
-
When you feel you know the pose well, then for half the time
you are here, pull the toes in a downwards position towards the forehead, so
that you can do a gentle stretch to the Achilles tendon and the hamstrings.
-
This pose is doing a number of things, primarily bringing
blood to the thyroid glands, secondarily it is, by sheer weight of the body,
compressing each of your vertebrae, thus allowing blood to course through
those areas and cleanse any toxins from your spine.
-
Very slowly, to finish this exercise, let the feet be drawn
towards the floor behind your head, so that you now stretch the spine
allowing the toxins to be released for the spine.
-
The time you do this posture is entirely up to you. You must
LOVE doing this posture and you must be comfortable. As time goes by, you
can sustain this posture for long periods in total stillness and LIGHT!
Do It!
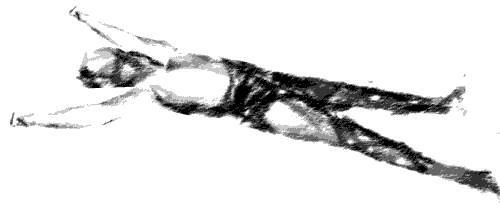
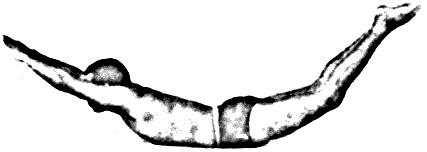
Pose 2 - Sethu Bandhasan (Bridge Pose)
While still in the shoulder stand position slowly, keep your
hands on the kidney area of the back, lower the legs towards the floor and lift
the pelvic region as high as possible while still remaining comfortable.
Hold as long as you still love to do this pose. You may find it
difficult to go directly from the shoulder stand to the bridge pose, but you
should practice it like this.
When you go into the bridge pose, bring your legs as far forward
as you can hold them. Then as the lumbar region becomes more supple, the legs
will fall more easily. This will help to strengthen the stomach and lower back
muscles - which soon will be strong enough to lower the legs all the way.
Visualize light where the tension is greatest.
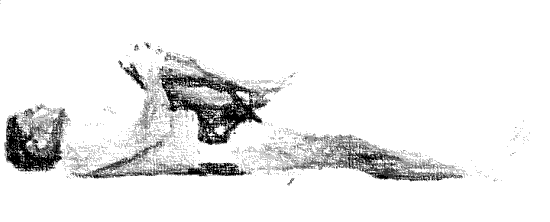
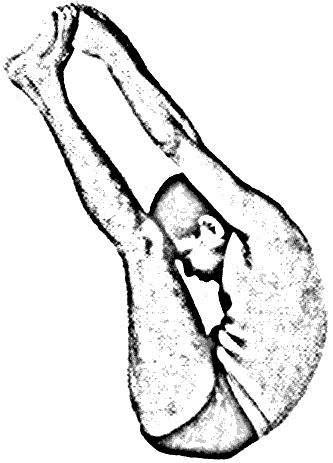
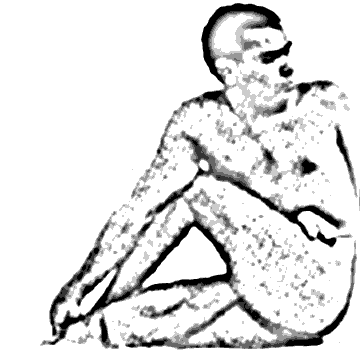
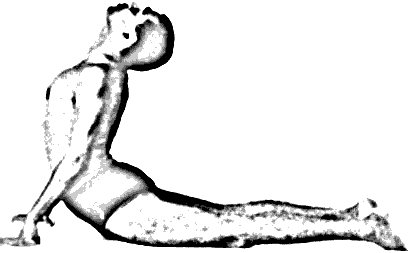
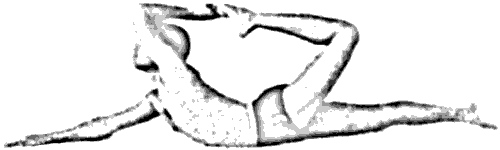
Pose 3 - Kama Peedasan (Ear-Knee Pose)
This pose is a more extreme stretch for your spine and it works
on every chakra.
-
While performing the pose visualize light along your entire
spine. Breath very slowly and regularly.
-
Don't worry if you can't reach the ears right away. This
will come with time. When you do reach your ears, you will notice such an
improvement in your flexibility.
-
What you won't really notice is the most important thing.
You are preparing your chakras to receive the Kundalini power residing in
the coccyx center at the base of the spine.
-
Kundalini is the primordial Shakti energy, which must, in
Yoga be directed upwards to the higher brain centers. The entire existence
of the cosmos is brought about by Shakti (energy) and Prakritti (matter).
When these two forces are united in the Ajna center (the 6th center - that
point between the eyebrows just above the bridge of the nose, the reality of
the "Spiritual Eye" becomes self evident.
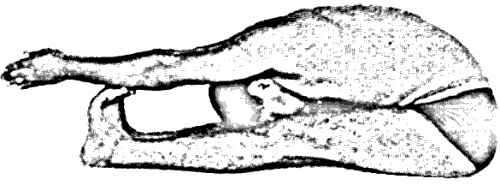
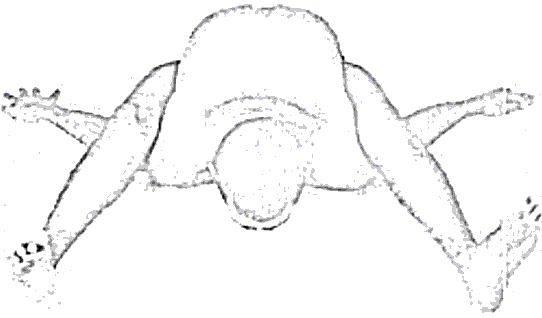
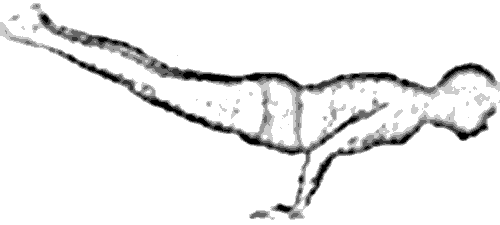
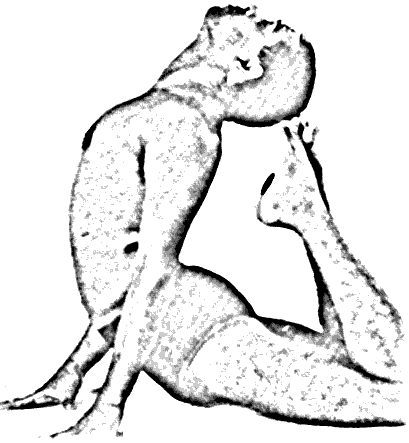
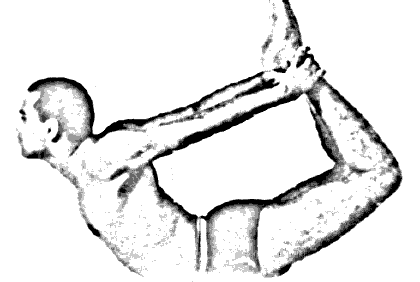
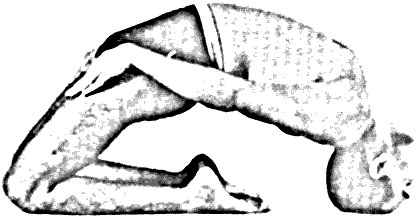
Pose 4 - Swing Pose
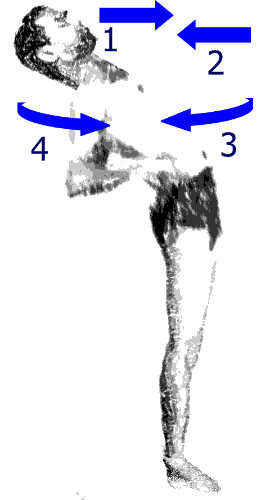 To
finish the knee-ear pose, one must do the reversal of it by standing with legs
slightly apart and knees bent, hands on the kidney area while leaning backwards
as far as one can comfortably go without falling over.
To
finish the knee-ear pose, one must do the reversal of it by standing with legs
slightly apart and knees bent, hands on the kidney area while leaning backwards
as far as one can comfortably go without falling over.
The head must be thrown backwards as far as it will go so you
can stretch the neck area. Hold that position steadily and quietly as long as
you are comfortable.
Then while keeping your hands in that position, first learn
forward, then go back again, the rotate the upper body in a full circular motion
to the left, then to the right, three times each way.
This pose is an immediate counter pose to the knee-ear pose and
works on the thoracic and lumbar regions of the spine.
Visualize light where the tension is greatest.
Now, Do It.
Pose 5 - Padmasan Pose (Lotus Pose)
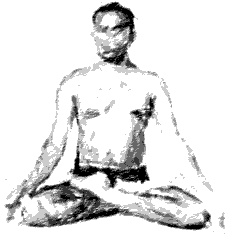 In
this pose we are going to work on the hips, knees, and ankles.
In
this pose we are going to work on the hips, knees, and ankles.
Why is this pose so important and why do you see so many Yogis
in this posture?
It is because when one attains Samadhi, one will not fall over.
This pose is perfectly balanced position for sitting.
There are many steps to getting into this position, but you must
start somewhere. So, sit with your legs outstretched and with both hands grab
your right foot and pull it slowly up towards your left thigh and place it on
top of the thigh, well into the groin area. Just go as far as you comfortably
can.
If possible, take hold of the other leg and pull it over the
ankle of the right foot. It is important that you only go as far as you can and
only sit as long as you are comfortable. Remember there is always your evening
session that you can practice again. Soon you will be able to do the full Lotus.
Some people who are bow legged may have difficulty, but try nonetheless, as it
opens up the pelvic area and stimulates the Kundalini force in the Mulhadara (Coccyc)
center.
Visualize light over the knees, hips and ankles.
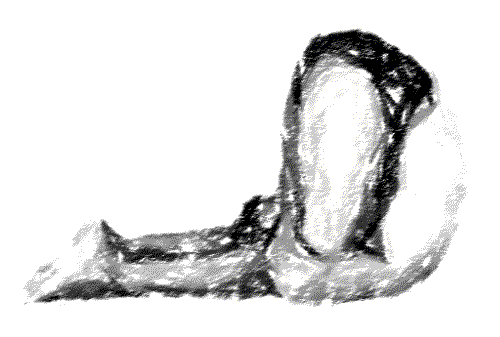
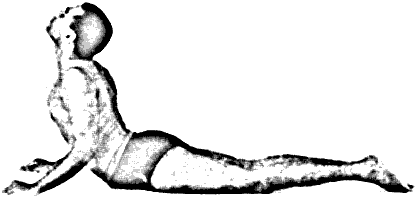
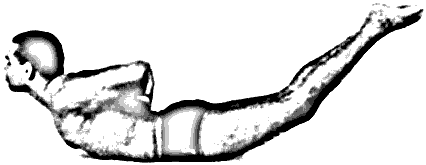
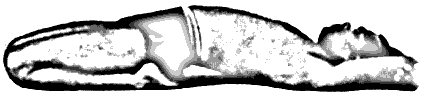
Pose 6 - Relaxation Pose
Always finish your Hatha Yoga with relaxation pose. Completion
is achieved by lying prone on the floor, with hips centered on the floor. Shimmy
the legs away from you while keeping the hips stationary. Again, shuttle back
and shoulders up and away from hips. When this has been achieved, throw your
arms above your head.
Once you have finished shimmying as outlined on the previous
page, throw your arms above and over your head as seen below. This is the
completion of the relaxation position. You will the tremendous stretch it gives
to the rib cage. It will also gently pulls the spine out to a full resting
posture. The relaxation pose should be done at the end of your routine or after
each pose. The choice is yours. In the relaxation pose, or any meditative
posture, the light focus should be between the eyebrows and the middle of the
forehead
HATHA YOGA - LESSON 2
Hopefully you aren't too sore and hopefully you love practicing
your Yoga because that's the key to Yoga. Love what you do.
After you have mastered Lesson 1 then proceed to Lesson 2.
About Lesson 2
In this series of postures, please do not force
them. Go as far as you can comfortably stretch. You don't want to have any pain
the next day.
You want to enjoy and love doing these postures. Without love there is
effort, and we don't want that do we?
Yoga is effortless. Each new lesson will be the same as the previous lesson,
but with some new poses added to it.
It will obviously take some time to complete each lesson as they get longer
and although this may sound daunting, I assure you, it is a natural progression,
and you will love doing them all together!
Please read and view this whole lesson before
practicing this lesson
Let's review what is new in Lesson 2:
- Lesson 2 Overview
- Pose 6: Vatayvanasan (The Wind Expelling Pose)
- Pose 7: Paschimothan (Head Knee Pose)
- Pose 8: Paschimothan (Head Knee Pose with a twist)
- Pose 9: Kurmasan (Tortoise Pose)
- Pose 10: Sethu Bandhasan (Bridge Pose)
Lesson 2 Overview
The poses in purple are new,
freshly added poses so be sure to read about them while reviewing poses from
Lesson
-
Pose 1: Sarvangasan (The shoulder stand)
-
Pose 2: Sethu Bandhasan (Bridge Pose)
-
Pose 3: Karna Peedasan (Ear-knee Pose)
-
Pose 4: Swing Pose
-
Pose 5: Lotus Pose
-
Pose 6: Vatayvanasan (The wind
expelling pose)
-
Pose 7: Paschimothan (Head Knee Pose)
-
Pose 8: Paschimothan (Head Knee Pose)
- with a twist.
-
Pose 9: Kurmasan (Tortoise Pose)
-
Pose 10: Sethu Bandhasan (Bridge Pose)
-
Pose 11: Relaxation Pose
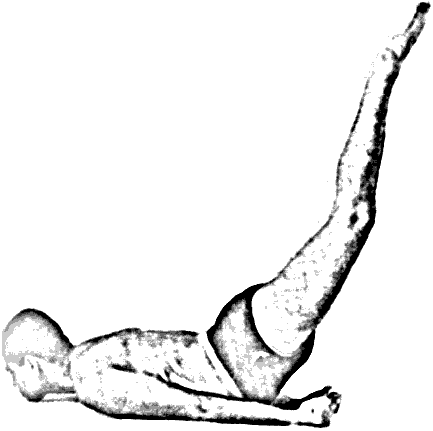
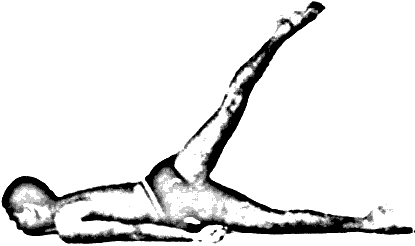
Pose 6 Vatayvanasan (The Wind Expelling Pose)
Lie flat on the floor, take a deep breath and hold it for as
long as is comfortable, while you lift one knee up to the abdomen, grasping the
knee with both hands, pull it towards the abdomen as far and as tight as you
can. Hold it until you have to release your breath slowly.
Now do the other leg. Do each leg three times, and then do both
legs together three times. Don't forget to take a deep breath before you
start each knee pull.
Older people can do this with ease and it will help correct many
abdominal problems, while at the same time stretching the back, hamstrings and
also the lumbar region.
Pose 7 Paschimothan (Head Knee Pose)
Lie flat on the floor with arms over the head. Now take a deep
breath and hold it as you lift to a sitting position. Let the breath out and
bend forward at the same time. Grab hold of your toes and stay comfortable. When
you feel the need to take a breath, rise up, breathe and lay back down with arms
over the head again. Breathe naturally. Repeat about 6 times.
Next, see the following diagram, and lift yourself onto the
buttocks, while remembering the breathing and the comfort levels.
If you are not very strong and in shape, do not hold on to the
toes. These two postures strengthen all the internal organs and elasticize the
lumbar region.
Pose 8 Vatayvanasan (The Head Knee Pose with a twist)
This is the same pose as the the second one in this series, but
this time, rather than grabbing the toes, stretch your arms outright and try
and get your elbows on top of the toes.
Remember the breathing sequence. Do 3 times.
Pose 9 Kurmasan (Tortoise Pose)
Slightly advanced.
Spread legs apart, lean forward while exhaling and place arms
under the legs.
Push your arms straight backwards, and straighten legs as much
as you can.
Hold comfortably until you have to breath. Come up to the
sitting position, take some deep breaths until comfortable and then repeat 3
times.
Pose 10 Sethu Bandhasan (Bridge Pose)
To finish this series, you will do the Bridge Pose as described in the first
lesson.
We do this Bridge Pose again because this pose will counteract all the
stretching of the lumbar region.
As with every series of postures complete them with the Relaxation Pose.

HATHA YOGA - LESSON 3
Start lesson 3 after you have practiced lesson 1 and 2 enough that your body
is ready to progress.
About Lesson 3
To begin this third set I will start you out on a 30 second
vibratory motor exercise. Your whole body will be vibrating with energy.
Stand with legs slightly apart, arms at your side. Take a deep
full triple breath. This is done by expanding the lower abdominal muscles while
inhaling, then expand the rib cage outwards, then inhale completely up into the
upper chest. This is the full triple Yogic breath.
All Yogic breathing should be practiced like this. In the
beginning take this breath in as comfortably as you can and then hold it.
Now begin to curl the toes under and tense them, gradually
tensing the ankles then the calves (without releasing your previous tensions),
then the thighs, the hips and the buttocks, the stomach muscles, the small of
the back, the hands and arms at the same time, then the chest and pectorals and
back. Then tense the neck and the entire chin and face and ears. The whole body
should be just vibrating like crazy. This whole pose should take no longer than
30 seconds.
Now release the breath and relax by shaking loosely the arms and
legs. Repeat three times. No more than three times.
Now you are ready for lesson three.
If you have the time, start from the very beginning of lesson
one right up to this point and then carry on with the next few postures.
Please read and view this whole lesson before
practicing this lesson
Lesson 3 Overview
The poses in purple are new,
freshly added poses so be sure to read about them while reviewing poses from
Lesson
-
Pose 1: Sarvangasan (The shoulder stand)
-
Pose 2: Sethu Bandhasan (Bridge Pose)
-
Pose 3: Karna Peedasan (Ear-knee Pose)
-
Pose 4: Swing Pose
-
Pose 5: Lotus Pose
-
Pose 6: Vatayvanasan (The wind expelling pose)
-
Pose 7: Paschimothan (Head Knee Pose)
-
Pose 8: Paschimothan (Head Knee Pose) - with a twist.
-
Pose 9: Kurmasan (Tortoise Pose)
-
Pose 10: Sethu Bandhasan (Bridge Pose)
-
Pose 11: Ardha MaisendrasanN (Spinal
Twist)
-
Pose 12: Mayoorasan (The Peacock
Stand)
-
Pose 13: Kakasana (The Crow Pose)
-
Pose 14: Relaxation Pose
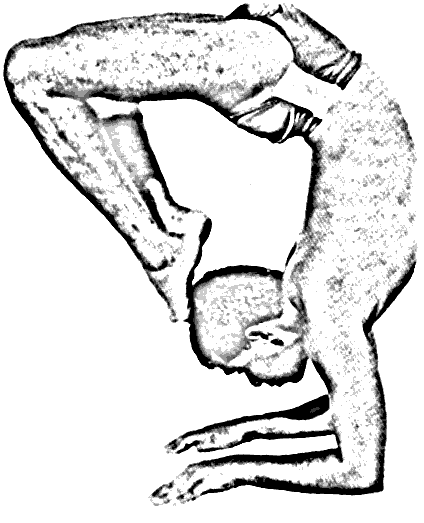
Pose 11 Ardha Maisendrasan (Spinal Twist)
The three following photos show the Spinal Twist in it simple,
advanced and final stages.
Some people find it confusing to get the elbow on the right side
of the knee. But if you look carefully at the picture you will see that it is
the elbow which is at the top side of the outside of the knee.
These postures should be held for a comfortable period. They
will create a flexibility of the spine that is necessary, after doing the former
poses.
You must realize when all the postures have been mastered that
you will do the entire series in one sitting. That way, the entire spine, pelvic
region, neck and shoulders and legs, will be vibrating with energy.
The first posture is rather simple in that for a beginner you
twist and hold just as long as it is comfortable.
The next pose you reach one arm behind your back and try and
grab your toe which you have by now pulled towards your body.
The last of this pose, try and get the foot into the pelvic
region.
With this Spine Twist, you can either leave the raised leg bent
at the knee and up, or you can bend it even further and reach the toe toward the
fingers behind your back.
Pose 12 Mayoorasan (The Peacock Stand)
Lay flat on your stomach with the legs close together.
Now raise your self up on your hands (which are pointing
backwards) and place the elbows into the "waist-pelvic" area, making
sure that the elbow, being against the pelvic bone will not slip out from under
you.
In this position take a deep breath and begin to raise the legs
off the floor. To accomplish this balancing act it helps to lower the chest
slightly so that your elbows are acting as a fulcrum.
Once balanced parallel to the floor you may begin to breath
regularly but shallow breaths.
This posture is fabulous for all abdominal areas and all the
organs and glands therein. It also aids in awakening Kundalini from her coiled
position. It begins to give you great strength and balance.
Pose 13 Kakasana (The Crow Pose)
With your hands on the floor, give a small lift with your legs
and place the knees high up close to the arm pits. 
Balance there as long as you are comfortable.
This is one preparation to enter the head stand, as it
increases blood flow to the brain, especially if you drop your neck, leaving the
head relaxed and without tension.
Breath comfortably, and when you feel you are ready to try the
head stand, then slowly lower the head to the floor, while lifting the legs
heavenward.
 Now
this does take a bit of muscular strength at this point. Just keep practicing it
until your head is between your hands and your legs can be lifted vertical.
Now
this does take a bit of muscular strength at this point. Just keep practicing it
until your head is between your hands and your legs can be lifted vertical.
The moment you are vertical, put slight pressure on one for arm
and bring the other hand around to clasp the top of the head. Now bring the
other arm around.
You are now in the headstand.
To perfect this dual posture movement (crow pose to headstand)
learn to do it very slowly - like a ballet movement.
HATHA YOGA - LESSON 4
Start lesson 4 only after you have practiced the first 3 lessons
long enough to prepare your body for the more challenging poses found in lesson
4.
About Lesson 4
Continue practicing your Yoga with all that you have learned so
far while adding the new poses of Lesson 4.
Please read and view this whole lesson before
practicing this lesson
Let's review what is new in Lesson 4:
-
Lesson 4 Overview
-
Pose 14: Buhujangasan (Cobra Pose)
-
Pose 15: The Cobra Second Position
-
Pose 16: Advanced Cobra
-
Pose 17: Salhabasan (The Locust Pose)
-
Pose 18: Half Locust
-
Pose 19: The Complete Locust
-
Pose 20: Arms at Back Locust
-
Pose 21: Final Locust
Lesson 4 Overview
The poses in purple are new,
freshly added poses so be sure to read about them while reviewing poses from
Lesson
-
Pose 1: Sarvangasan (The shoulder stand)
-
Pose 2: Sethu Bandhasan (Bridge Pose)
-
Pose 3: Karna Peedasan (Ear-knee Pose)
-
Pose 4: Swing Pose
-
Pose 5: Lotus Pose
-
Pose 6: Vatayvanasan (The wind expelling pose)
-
Pose 7: Paschimothan (Head Knee Pose)
-
Pose 8: Paschimothan (Head Knee Pose) -
with a twist.
-
Pose 9: Kurmasan (Tortoise Pose)
-
Pose 10: Sethu Bandhasan (Bridge Pose)
-
Pose 11: Ardha MaisendrasanN (Spinal
Twist)
-
Pose 12: Mayoorasan (The Peacock
Stand)
-
Pose 13: Kakasana (The Crow Pose)
-
Pose 14: Buhujangasan (Cobra Pose)
-
Pose 15: The Cobra Second Position
-
Pose 16: Advanced Cobra
-
Pose 17: Salhabasan (The Locust Pose)
-
Pose 18: Half Locust
-
Pose 19: The Complete Locust
-
Pose 20: Arms at Back Locust
-
Pose 21: Final Locust
-
Pose 22: Relaxation Pose
Pose 14 Buhujangasan ((Cobra Pose)
Lay flat on the floor and rest until comfortable and relaxed.
Then place your hands by your shoulders, VERY slowly raise the back, feeling
every part of the spine contracting. Keep the hips and the abdomen on the floor,
slowly stretch the neck and head backwards.
This a wonderful exercise for the spine and the abdominals.
When you are doing this posture, breath in as you slowly raise
up. Retain as long as comfortable, then VERY slowly lower your self to floor
concentrating on the movement of the spine.
Do this no more than 5 or 6 times.
Always do the opposing posture very slowly - ex: the head knee
pose (lesson 2 - pose 7) right after each of the series of five or six Cobras.
Pose 15 The Cobra Second Position
You will notice the elbows are bent in the first posture, but as
you become more supple then you can straighten the arms and lean the thorax back
as far as you can comfortably go. Let the head fall back also.
Breathe in as you lift up and back, and breath out as you
release and lay back down.
Pose 16 Advanced Cobra
In this third position of the Cobra try and lift the hips as far
off the floor without lifting the thighs too far. Throw the head back and lift
the legs from the knees only and attempt to touch toes to head.
Make sure you breathe solely as you rise and exhale as you relax
down.
Each posture to be done no more than 6 times.
Now do the elbow knee posture (lesson 2 - pose 8) and hold it
for a while.
Pose 17 Salhabasan (The Locust Pose)
A strengthening exercise - read carefully:
Lay face down, chin on the floor, inhale and exhale a few times.
Keep the hands firmly on the floor back and under you.
Now on the inhalation slowly lift the legs and the hips off the
floor. Keep everything as straight as possible. Do not bend the knees.
Just hold this for a few seconds. In the beginning it takes
muscle, so be gentle with yourself.
Remember, do not be turned ON or OFF by pain. When you feel
pain, just hold the pose for ten seconds more. That increases the Will power
without indulging yourself in the pain.
You want to keep on loving these postures, so be gentle, you have your whole
lifetime ahead of you. You want to come away feeling very relaxed and GOOD with
yourself.
If you don't, then you are doing them too long and too often.
Pose 18 The Half Locust Pose
This is the beginning of the complete Locust pose, and you must
start with one leg, then the other. While lifting the right leg up and keeping
it straight, don't let the left one leave the floor.
Pose 19 The Complete Locust Pose
 In
this pose you have to press the chin well into the blanket on the floor.
In
this pose you have to press the chin well into the blanket on the floor.
Keep your hands well together and placed under the hips and very
slowly lift the lower body so that the feet are directly above the head.
When you are nimble you can drop the feet so that they touch the top of the
head.
Once you have mastered the idea of breathing in as you rise and
exhaling as you descend you can then begin to stay in the Locust for a
comfortable period.
But you must breathe regularly and
harmoniously.
Pose 20 Arms at Back Locust Pose
This is a great balance exercise also.
Place your arms on your back as in the picture (keep them as
high as possible), lift the chin and legs off the floor so that you rest on the
abdomen.
Pose 21 The Final Locust Pose
Lay flat on the floor, stretch arms out before you, take in a
slow breath and raise the chin and legs at the same time.
These postures are readying you for the next series. Good luck
with them and take it easy.
HATHA YOGA - LESSON 5
Start lesson 5 only when your body is ready.
About Lesson 5
Continue practicing your Yoga with all that you have learned so
far while adding the new poses of Lesson 5.
Please read and view this whole lesson before
practicing this lesson
Disclaimer: There are inherent risks in doing any form of
stretching. Please consult your doctor prior to practicing Hatha yoga if you
have any concerns.
Let's review what is new in Lesson 5:
-
Lesson 5 Overview
-
Pose 22: Dhanurasan (Bow Pose)
-
Pose 23: Poorna Dhansurasan (The Full Bow Pose)
-
Pose 24: Single Leg Bow Pose
-
Pose 25: Supta Vajrasan (Kneeling Pose)
-
Pose 26: Full Kneeling Bow Pose
-
Pose 27: Poorna Supta Vajrasan (The Diamond Pose)
-
Pose 28: Kapotha Asan (Pigeon Pose)
-
Pose 29: Vrishikisan (Scorpion Pose)
-
Pose 30: The Complete Scorpion
Lesson 5 Overview
The poses in purple are new,
freshly added poses so be sure to read about them while reviewing poses from
Lesson
-
Pose 1: Sarvangasan (The shoulder stand)
-
Pose 2: Sethu Bandhasan (Bridge Pose)
-
Pose 3: Karna Peedasan (Ear-knee Pose)
-
Pose 4: Swing Pose
-
Pose 5: Lotus Pose
-
Pose 6: Vatayvanasan (The wind expelling pose)
-
Pose 7: Paschimothan (Head Knee Pose)
-
Pose 8: Paschimothan (Head Knee Pose) - with a twist.
-
Pose 9: Kurmasan (Tortoise Pose)
-
Pose 10: Sethu Bandhasan (Bridge Pose)
-
Pose 11: Ardha MaisendrasanN (Spinal Twist)
-
Pose 12: Mayoorasan (The Peacock Stand)
-
Pose 13: Kakasana (The Crow Pose)
-
Pose 14: Buhujangasan (Cobra Pose)
-
Pose 15: The Cobra Second Position
-
Pose 16: Advanced Cobra
-
Pose 17: Salhabasan (The Locust Pose)
-
Pose 18: Half Locust
-
Pose 19: The Complete Locust
-
Pose 20: Arms at Back Locust
-
Pose 21: Final Locust
-
Pose 22: Dhanurasan (Bow Pose)
-
Pose 23: Poorna Dhansurasan (The Full
Bow Pose)
-
Pose 24: Single Leg Bow Pose
-
Pose 25: Supta Vajrasan (Kneeling
Pose)
-
Pose 26: Full Kneeling Bow Pose
-
Pose 27: Poorna Supta Vajrasan (The
Diamond Pose)
-
Pose 28: Kapotha Asan (Pigeon Pose)
-
Pose 29: Vrishikisan (Scorpion Pose)
-
Pose 30: The Complete Scorpion
-
Pose 31: Relaxation Pose
Pose 22 Dhanurasan (Bow Pose)
This is one of the very best postures for the ENTIRE spine as it
is bent like a bow.
Rest on the floor and grabbing one leg and then the other, by
the ankles, slowly - I repeat again , all exercises are done very slowly,
lift chest and legs off the floor.
The secret with this pose is that you can go as easily as you
wish - so don't force. In time you will be able to do some of the
advanced back bending poses.
Pose 23 Poorna Dhansurasan (The Full Bow Pose)
You must be careful in doing this posture as it is an
extreme exercise for the spine. DO NOT FORCE THIS ONE. Instead very gently grab
hold of the big toes of each foot and go as far as you can comfortably.
In the bow pose, you do not breathe while holding the posture in
the beginning. The whole point of not breathing is to make sure you will not
hold the pose too long. As soon as you want to breathe then that's the time to
let go of the pose. Come out of the pose before you gasp too much.
Please note that there can be a tendency to want to take deep
breaths in between the postures. Therefore, make sure that your breathing is
comfortable before starting the full bow pose. Start the pose on a natural and
comfortable "in breath", not a deep one.
You can hold the pose longer once your spine is used to the
pose. At this point you can breathe very shallow while holding the pose.

Pose 24 Single Leg Bow Pose
This pose is done two ways.
First, use the right hand to hold the right toe and then use the
left hand to hold the left toe. Then, use the right hand to hold the left toe
and then use the left hand to hold the right toe.
This way you give exercises to the spine that literally roll and
rock the spine into perfect alignment.
Pose 25 Supta Vajrasan (Kneeling Pose)
Another great spine posture that also gives added blood to the
throat area.
Make sure your top of head is on the floor and hands are resting
on the thighs.
Pose 26 Full Kneeling Pose
Sit on the heels and with the help of your elbows on the floor
let yourself down slowly and far as you can go.
You can keep the hand behind the head - or above
stretched outwards.
You can breath shallow while doing these bow poses.
Pose 27 Poorna Supta Vajrasan (The Diamond Pose)
You can see how wonderfully this expands the thoracic area and
also the Lumbar section. When you are flexible you can begin to draw the head
towards the heels resting the forehead on the floor. This pose is wonderful for
fifth center in the throat area.

Pose 28 Kapotha Asan (Pigeon Pose)
As in the picture tuck the left leg well up in to the crotch and
put the right leg behind you. Then lift the right leg and grab it with both your
hands and slowly stretch.
Take it easy on this one. You can then reverse the leg
positions.
Pose 29 Vrishikisan (Scorpion Pose)
This is the first pose of a very difficult set of poses.
It requires balance and proficiency and the former postures in
the lessons must be mastered before attempting the following poses.
While kneeling on the floor place your forearms with hands flat
out and brace yourself as you try and rise slowly into this posture.
You may need a kick-start in the beginning, but that is okay.
Soon you will be able to rise up with strength and balance alone.
Pose 30 The Complete Scorpion
The same beginning as the last posture but while balancing
try and drop the legs slowly to the head so that the toes are touching the top
of the head.
This is another extreme posture so only practice it when your
back and spine are ready for it.
Real Yoga With Swami Harinanda
© Copyright 1996 - 2024 by Jai Dee
Marketing and Swami Harinanda- www.jaideemarketing.com
Legal Action Will Be Taken Against Violators
Jai Dee Marketing and Swami Harinanda allow you to print Real
Yoga With Swami Harinanda for personal use only. Under no circumstances
may you redistribute this book in any form for profit or otherwise.
For additional information about the book Real
Yoga With Swami Harinanda, please visit www.real-yoga.com